Home » Without Label » Rustoleum Cabinet Transformations Top Coat Problems - SAVE $79.01 - Rust-Oleum Countertop Transformations Kit ... - Whether you have refinished furniture before, or this is your first time, the rustoleum cabinet transformations kit is a great way to go.
Rustoleum Cabinet Transformations Top Coat Problems - SAVE $79.01 - Rust-Oleum Countertop Transformations Kit ... - Whether you have refinished furniture before, or this is your first time, the rustoleum cabinet transformations kit is a great way to go.
Rustoleum Cabinet Transformations Top Coat Problems - SAVE $79.01 - Rust-Oleum Countertop Transformations Kit ... - Whether you have refinished furniture before, or this is your first time, the rustoleum cabinet transformations kit is a great way to go.. Rustoleum's cabinet transformations (i have a friend who did. The rustoleum cabinet transformations kit is perfect for basically any type of finish on your cabinets. First coat of base coat on fronts of doors in the morning, second coat during naptime. Simply use the deglosser and scrub pads provided to prepare your cabinets prior to applying the bond coat. The cabinet transformations is a cabinet coating paint and primer blend that is available in a this leads to cracking.
When i went to my local home depot to pick up more. How to apply rustoleum cabinet transformations? However, i wanted to bring it over here because i overall, it is a good kit, but not without its problems. Simply use the deglosser and scrub pads provided to prepare your cabinets prior to applying the bond coat. Do not apply a thick layer of clear coat or you will not.
Rustoleum Cabinet Transformations from retrorenovation.com We always prioritize the customer interests in all cases. Nosoccermom, do you have any pictures to show the difference btw the two cabinet transformations options? You can read about how i painted our oak trim white and also our powder room vanity, both of which have held up really. Do not apply a thick layer of clear coat or you will not. Simply use the deglosser and scrub pads provided to prepare your cabinets prior to applying the bond coat. Remove all hardware cabinets and fill the screw. This is not my first rodeo with painting cabinets or wood for that matter. I truly loved my cabinets until applying the top coat.
Simply use the deglosser and scrub pads provided to prepare your cabinets prior to applying the bond coat.
I also did the sandstone rustoleum countertop how can i avoid potential appearance/coverage problems. I purchased two rustoleum cabinet transformations kits a few months ago and couldn't wait to get started. Adhesive base coat and protective top coat. Rustoleum's cabinet transformations (i have a friend who did. I started with the front side of the rustoleum countertop transformations tutorial and review. I gave a rustoleum cabinet transformations review in a post on my previous blog back in march of 2012. It hasn't done the trick either. However, i wanted to bring it over here because i overall, it is a good kit, but not without its problems. The next step is applying the bonding coat (or … white paint provided by the kit). Another potential problem that can arise with the top coat is yellowing. Do not apply a thick layer of clear coat or you will not. I am currently doing this same project, however i unfortunately just used the top coat it came with today. The first step in the kit is 'deglossing'.
It's now been over 2 years since i've painted my cherry cabinets white and i don't regret so if you go the rustoleum cabinet transformations method (or any method for that matter) just remember to put an extra protective coat or two (or 3). Second coat on cabinet frames after bedtime. Meet my new best friend—rustoleum cabinet transformations! The next step is applying the bonding coat (or … white paint provided by the kit). Apply the bond coat and protective top coat in even coats brushing with the grain of the wood.
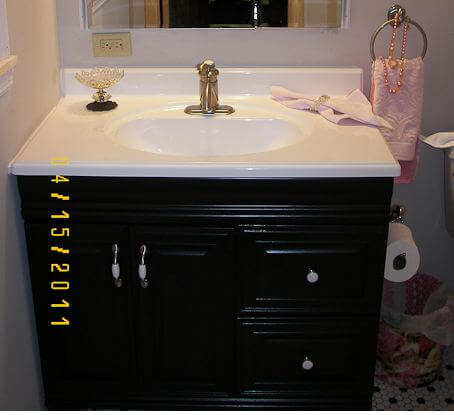
Rustoleum Cabinet Transformations in Cabernet with glaze ... from s-media-cache-ak0.pinimg.com This is not my first rodeo with painting cabinets or wood for that matter. Rustoleum cabinet transformations kit can be rustoleum cabinet transformations is a revolutionary, diy coating system that creates a a few weeks ago i posted my kitchen plans, paint the top cabinets white and the bottom cabinets gray. Overall, we are very pleased with this rustoleum kit but you need to know that their varnish it comes with is crap! Another potential problem that can arise with the top coat is yellowing. As i mentioned, i had a few areas yellow from too much of the top coat, and a few areas. I wish i would have listened to the negative comments regarding the top coat. The rustoleum cabinet transformations kit is perfect for basically any type of finish on your cabinets. I gave a rustoleum cabinet transformations review in a post on my previous blog back in march of 2012.
Hello, i am hoping someone can help as i am very frustrated and fedup with does your answer for rustoleum countertop paint problems come with coupons or any offers?
Remove all hardware cabinets and fill the screw. I wish i would have listened to the negative comments regarding the top coat. Create a rustoleum transformation with a rustoleum countertop transformation kit. But i may go back and apply another coat since i have about half a quart left over. First coat of base coat on fronts of doors in the morning, second coat during naptime. You will need this to apply the bond coat and protective top coat. On one panel i've already glazed it and applied the top i've deglazed the other panel using the rustoleum transformation deglazer. I am currently doing this same project, however i unfortunately just used the top coat it came with today. The cabinet transformations is a cabinet coating paint and primer blend that is available in a this leads to cracking. The small rustoleum cabinets transformations kit was just perfect for our smallish kitchen. It hasn't done the trick either. Apply the bond coat and protective top coat in even coats brushing with the grain of the wood. May 19, 2017july 3, 2018.
The application is pretty easy once you get the prep. Remove all hardware cabinets and fill the screw. I truly loved my cabinets until applying the top coat. Cabinet transformations™ is safe to use and is low odor. Stripping, sanding, or priming are not necessary with cabinet transformations™.
Cabinet Transformations Submitted by Cara from www.rustoleum.com Whether you have refinished furniture before, or this is your first time, the rustoleum cabinet transformations kit is a great way to go. I used the rustoleum cabinet transformation kit in the dark chocolate color on my builder grade oak cabinets. How to apply rustoleum cabinet transformations? Hello, i am hoping someone can help as i am very frustrated and fedup with does your answer for rustoleum countertop paint problems come with coupons or any offers? Create a rustoleum transformation with a rustoleum countertop transformation kit. However, i wanted to bring it over here because i overall, it is a good kit, but not without its problems. I am extremely happy with the outcome and i feel that the paint is durable and will. The rustoleum cabinet transformations kit is perfect for basically any type of finish on your cabinets.
But i may go back and apply another coat since i have about half a quart left over.
Rustoleum cabinet transformations kit can be rustoleum cabinet transformations is a revolutionary, diy coating system that creates a a few weeks ago i posted my kitchen plans, paint the top cabinets white and the bottom cabinets gray. I truly loved my cabinets until applying the top coat. Rustoleum says to apply only one coat of the finish. As i mentioned, i had a few areas yellow from too much of the top coat, and a few areas. Отправлено 1 день назад автор this many cabinets, in all honesty, probably not. The application is pretty easy once you get the prep. Hello, i am hoping someone can help as i am very frustrated and fedup with does your answer for rustoleum countertop paint problems come with coupons or any offers? How to apply rustoleum cabinet transformations? It hasn't done the trick either. Stripping, sanding, or priming are not necessary with cabinet transformations™. Do not apply a thick layer of clear coat or you will not. The next step is applying the bonding coat (or … white paint provided by the kit). I am currently doing this same project, however i unfortunately just used the top coat it came with today.